DIY MADE SIMPLE
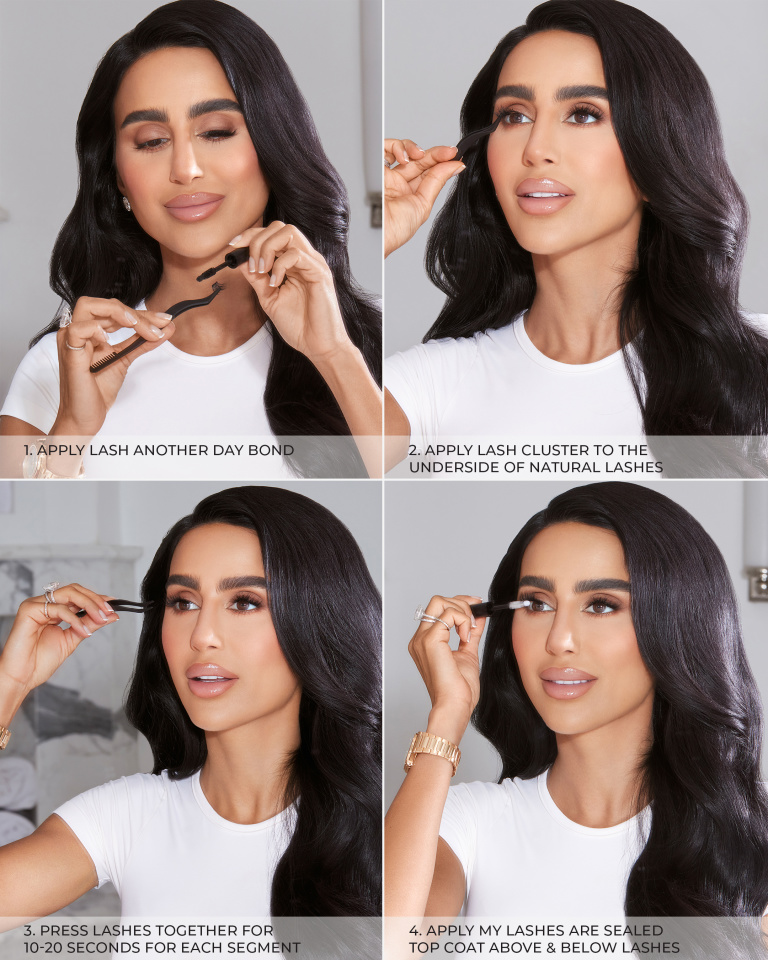
AT-HOME LASH EXTENSIONS IN FOUR EASY STEPS
STEP 1
Apply LASH ANOTHER DAY Extended Wear Lash Bond
STEP 2
Apply lash clusters to the underside of natural lashes
STEP 3
Using applicator, press lash clusters & natural lashes together
STEP 4
Apply MY LASHES ARE SEALED Lash Top Coat

Tips & Techniques
You've got questions, we're here to help! Here's everything you need to know...
LEARN ABOUT
Frequently Asked Questions
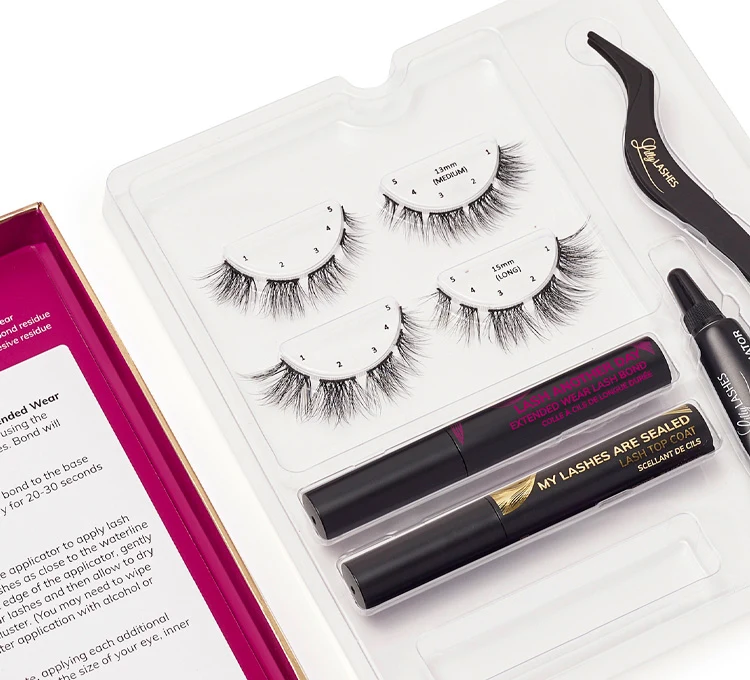
Lilly Lashes 3D Undercover Lash Extensions are created with the same high quality fibers as our strip lashes but there are three major differences:
(1) Application: Our Undercover lashes are individual clusters applied underneath your natural lashes for a more natural, seamless look while traditional false eyelashes are applied above your natural lashes on your lash line.
(2) Size: These at-home lash extensions come in small segments, providing a more customizable look compared to traditional strip lashes, which are pre-made in a single strip.
(3) Length of wear: Our lash extensions are applied with a long lasting bond for multi-day wear.
We created at-home lash extensions with the same high quality, handmade, 3D layered patterns as our iconic styles. 3D Undercover Lash Extensions feature soft, fluttery layers of faux mink hair fibers and mimic the look of real lash hairs (no fake, plastic looking lashes here!). We created lash clusters in various sizes and lengths for ultimate customization, including 2 smaller inner corner lashes.
Click here to watch a step by step video
DIY MADE SIMPLE IN FOUR EASY STEPS
STEP 1 - Apply LASH ANOTHER DAY Extended Wear Lash Bond
STEP 2 - Apply lash clusters to the underside of natural lashes
STEP 3 - Using applicator, press lash clusters & natural lashes together
STEP 4 - Apply MY LASHES ARE SEALED Lash Top Coat

Click here to watch a step by step video
If using THE BOND ELIMINATOR Adhesive Remover, open by cutting the tip of the nozzle with scissors. Please note, any oil-based makeup remover can also be used for removal.
STEP 1 - Squeeze a drop of remover onto a cotton swab or your fingertips.
STEP 2 - Apply remover where the lash clusters and your natural lashes meet to loosen the bond. Wait a few seconds and gently remove the lash clusters.
STEP 3 - Massage remover throughout your natural lashes to remove any excess adhesive before washing your face and rinsing your natural lashes clean.
The lashes are made for multi-day wear. For longevity, keep oil-based products away from the eye area. If needed, touch up with the bond and sealer.
Yes! With the right care, you can enjoy our 3D Undercover Lash Extension Clusters over and over again. Here's how to make the most of your lashes:
- Gently Remove Adhesive: After enjoying your lashes, carefully remove any adhesive residue from the lash band using tweezers or your fingers. Be gentle to avoid damaging the lash band or the fibers.
- Cleanse & Sanitize: Soak your lashes in a mixture of warm water and a mild, oil-free makeup remover. Gently brush through the lashes with a clean spoolie or a lash brush to remove any makeup or debris. Rinse them thoroughly and pat them dry with a lint-free cloth.
- Store with Care: Place your clean lashes back in their original packaging or a lash case to protect them from dust and dirt. Run through the lashes with a spoolie to separate the hair fibers.
- Handle with TLC: When reapplying your lashes, be gentle to prevent any damage to the lash band or the fibers.
Avoid getting your lashes wet for at least 24 hours after application. Additionally, we recommend avoiding full submersion in water. While they may get slightly wet during a shower or splashed in the pool, if your lashes do get wet, allow them to completely air dry. Once dry, use the applicator to press the clusters and your lashes together. Reapply additional bond and sealer as needed to ensure a secure bond.
To wash your face, use an oil-free makeup wipe (we find this the easiest way!), or use an oil-free cleanser with a wash cloth or cotton pad to gently cleanse your skin and remove makeup. Avoid your lash line and be mindful not to touch your lashes in the process.
Our lashes are designed for easy, gentle removal using our specially formulated adhesive remover or an oil-based makeup remover. Your natural lashes will remain unharmed, ensuring a seamless and safe lash experience.
PREPARATION IS KEY
Make sure you start with clean, dry lashes. Avoid using any oil-based products around your eyes, as they can compromise the adhesive.
DON'T BE SHY WITH THE BOND
Make sure you're using enough bond on your natural lashes. Comb through your lashes with the spoolie and use the ball tip to focus bond at the base of your lashes. Additionally, make sure you're applying bond directly to the clusters as well. Give the bond time to get tacky before applying the clusters.
PRESS THOSE LASHES
Once lash clusters are applied, don't forget to press your natural lashes and the clusters together using the applicator. Make sure to provide enough pressure to bind the clusters to your natural lashes and activate the bond.
STAY DRY FOR 24 HOURS
Avoid getting your lashes wet for at least 24 hours after application. If your lashes do get wet, allow them to completely air dry. Once dry, use the applicator to press the clusters and your lashes together. Reapply additional bond and sealer as needed to ensure a secure bond.
It takes most people a couple of applications to master the process. Be patient and practice, and soon lash application will become a breeze! For our experienced customers, it only takes a few minutes per eye to put on a full set of 3D Undercover Lash Extensions!


![[object Object]](https://images.ctfassets.net/eebofzb4zxt9/18C2lpumguaL0C4I1NgHZw/fe74b7db31c9f40cec54059b606ba560/LL_Undercover_ESP13mm_Model_2.jpg?w=768&h=960&fl=progressive&q=95&fm=jpg&bg=transparent)
![[object Object]](https://images.ctfassets.net/eebofzb4zxt9/3isXvBpka3QW9j2t92zY1S/848f9fd4cb6cfc0d454cf5255a8dd894/LL_Undercover_SA13_Model_2.jpg?w=768&h=960&fl=progressive&q=95&fm=jpg&bg=transparent)


